Pages

October 7, 2011

Where have we been??


So apparently I’ve been (again) terribly remiss.

I’ve not posted anything on here for over 6 weeks!  Well I have been busy losing 20lbs (still more to go), but that’s really besides the point.  You need updates!?  Don’t you?

In the coming days you’ll hear about (in no particular order):

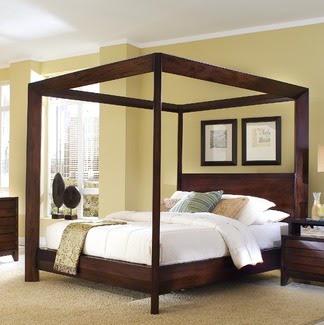
-          Our new bed, our amazing mattress, the fact that I now sleep soundly though the night (sawing cute cartoon logs) and an update on bedroom décor that has undergone some transformations
-          Our new nook table and the craigslist journey that ensued
-          Where our bathroom project currently is, and what the hall bath looks like mid-project
-          ALL about impulsive purchasing of large scale furniture, like dining tables and sectionals
-          A reupholstering project!
-          A curtain project!
-          A DIY Art project!
-          Update on the Office progress
-          Ideas on the Nursery (for an as-yet-to-be-incubating bean)

You are excited!  I can tell you are excited!

August 23, 2011

Master Bedroom Plans

First, do you notice we still haven't posted about the Master Bathroom?  It's on it's way, it's painted, the cabinet is done! WHOO.  We will be doing an interim reveal in the coming days once the second coat of paint (and all the hardware) go back up.  


In the meantime, we have a goody in the mail.


And I don't think it's going to fit int he mailbox.


This is our new bed.  Gorg.eous 


We hmmm-ed and haaaa-ed about it for weeks.  It was pricey, it was BIG, but it looked so perfect.  First seen on CSN.com, we shopped around but really couldn't find anything else we liked so much as this one.  


Our check-list for a bed went as follows:
- King
- Four Poster or Canopy
- Real Wood
- Headboard & Footboard
- Under $1000


So we checked everything except for the last box, but it was barely over.


This is our Master Bedroom currently, with a green tone on the wall that fluctuates between this mossy green in the picture and a brown-y grey in low light.  It's an OK color, and I've had something like this in the past.  It's calming and neutral.  We are gonna work with it for the time being and see what happens.  But I'm guessing it's gonna go.  I'm feeling Blues and Yellows in here.  And we will try for a wall color other than Gray.  No guarantees made though.  :)  I like my Gray.


Here is our current moodboard (subject to change, since Craig hasn't even seen this yet)


So, it's silver and brown and ...gray.  Oh well, what can I say I love the color.  I'll get to a sources post at some point, but it's all CSN.com, O.co, West Elm, Pier 1 and Urban Outfitters.


Here are our befores.  Sorry for the slight blurriness, my camera really doesn't like me when the flash is turned off.


And here is a mock-up.  This wall is the only one big enough for the bed.  And it JUST clears the ceiling fan.


What do you think?  Is there too much gray in our house?  Should I change my middle name to gray?

August 17, 2011

Putting Some Bird in the Loo

The bathroom is still in progress, and I have been remiss.

So while I finish cutting in and rolling the walls (cabinet is done!) we bring you quick decor fix #487 - ART!

I decided to stop in this little consignment shop I drive by on my way to work everyday.  It's called 'Accesorize Again' in Duluth, Ga.  Just wanted to see what they had in terms of furniture and accessories.  I saw a wonderful gold leafed mirror, thought about it for the closet, but I didn't feel like explaining why a $50 purchase for a closet was a good idea to my wonderful husband.  :)


Then I ran across these.


I really, really liked them.  I couldn't figure out where to put them though.  So I put them down and walked around the store more.  Then I had it!  The hall bath downstairs needed some art! 

And actually, I don't think you've seen the downstairs hall bath.  Here it is in it's BEFORE state.


I kinda dig the wallpaper.  I don't think it's anything we would have ever actually picked out (super pink?) but it's neat.  It has a french poem about a savage garden written in silver and gold metallic over the pink background. (Don't ask me what it says..)

So I lined up the prints on the wall to eyeball how far about they needed to be.  I really was enjoying how the gold on the frame played off the gold in the script. 

And voila!


Much better!

Yes?  What do you think of our new aviary additions?

And BTW, this light has to go.

August 8, 2011

Primed and (not) Painted Cabinet

The progress is slow, but hey, it's progress.  We've had a few interruptions (trip to Savannah, our one year anniversary) that have prevented more from being done on the bathroom, however I foresee the ability to conclude this project in the very near future.


So far, we have primed the cabinet.


What?  Yes, I know that's not a whole lot of movement from our last update, but the dang thing took 3!! coats of primer.  


Here is what we are starting with (forgive messy work-in-progress clutter):


And since you've never seen the other side of the room, here it is, bath on the left and shower on the right:


And our supplies for the 'HOW TO PAINT A LAMINATE CABINET' Adventure are:


 - Primer and/or Primer and Paint in One (BEHR Thorny Branch S-H-780)
 - Paint bucket

 - Paint Tray
 - Trim Roller
 - Sandpaper
 - Screwdriver
 - Painter's Tape (if needed)
 - Craft Brush (for the hard to reach details)
 - Paper Towel (for drips)
 - Beverage (in my case, being good and having water)
 - New hardware (if needed)


Step 1:  Remove existing hardware  
(optional: ponder using existing hardware, since its actually kinda nice)


Step 2: Sand panels and trim


Step 3: Prime cabinets (1st coat) AKA Realize you forgot where you packed your trim brush and prime with a craft brush that causes step 3 to take 2 hours.


During this step, your goal is a nice even light coat.  You are essentially looking to build a base for your paint to adhere to.  It will look streaky, don't worry about it, that's sorta what you want.


Step 4: Repeat Step 3 for the 2nd and 3rd coats (if necessary)


After you have finished the 2nd or 3rd coat, and have a pretty even base of coverage, let the paint dry overnight to cure.  Try to not get caught up in the day-to-day of life and unnecessarily have the paint cure for 7 days (I'll finish it sooner or later).


So here is where we are right now.  An even coat of the primer.  Next up, will be the dark Thorny Branch as a final coat.  Hopefully only one final coat.  *cross you fingers


July 28, 2011

Hanging with Mr. Cardigan

Remember when the TGIF line-up was the best part of your week?  I so do not miss the 90's.

So, yesterday we checked out the master-bath and our plans for it.  Today we are gonna talk about the adjoining room (can a closet be considered a room?), the closet.

Now, it's not the biggest closet in the world, nor it is the brightest, or even the sexiest.  But we are lucky in that it's a really good sizes for us (non-clothing-hording people that we are).  And we want to bring in some spiff-i-fication (I may trademark that word).

To refresh your memories, here is what our closet looks now (sans clothes):


And after dreaming and hoping and drooling all over my keyboard (pinterest) these were some inspiration pics that really spoke to me, and will also coordinate pretty well with our bathroom colors.


I really like the idea of having a stenciled wall, on at least the back wall there.  I think it will really add something special to what really could be considered an overgrown dresser you can fit your whole body into.

And (bane of my existence) the wire shelves haunt me here too.  Though I'm thinking up a solution to them.  Not yet sure if it's gonna work.  It involves covering the wire shelving though, since there is nothing wrong with the utility of them, just that they hurt my soul.

Now, lighting, as you will know, is also important.  I'd like a bit more light in this room, and the boob light isn't doing it for me (there are times and places for boobs, and the ceiling is not one of those places).  I purused the internets, and looked at some of my favorite sites for options that will coordinate with bathroom lighting and metal finishes.

This light (from shadesoflight.com) is actually the one I want.  However, as this is a closet, and this beauty is $250, it will have to be reserved for some other place in the house (wouldn't it be LOVELY in the foyer?  I thought so too!).


Searching more I found that HD is having a 20-70% sale (what a random range) and found this one.


Although it's not my favorite (see above) it still has some really nice feminine qualities that I am enjoying.  The best part is the price.  $35. Uh huh.  Marked down from $80.  And I think it will make pretty shadows.  Craig has given his grudging approval.

As for paint...well I'm leaning towards a muted dusty pink.  Then we will contrast with a lighter shade of pink, OR with a lighter shade of the gray that will go on the cabinets.  Or maybe we haven't quite decided yet.

I might even bring in a small rug for some more geometrics (chevron anyone?) like maybe this one from RugsUSA.com (which is not a chevron pattern I know):


So ultimately (with a little awful ms paint) we have something like this:


Thoughts?
I believe we will do bathroom first and leave closet for a little longer, but they will be done in somewhat-tandem.  And yes, the shelves will be removed for painting, maybe.  Or I'll just be lazy.

July 27, 2011

Turning our Attention to: The Master Bath

So as the Laundry has us in a bit of a decision limbo (do the cabinets? not do the cabinets? What would we even put in the cabinets?) it's off on another tangent!  (I excel at tangents, ask anyone).

Yesterday I even succeeded at getting Craig on this tangent.  And that, my friends, is the prerequisite to being able to start another project before I finish the current one!

HA!

So our Master bath is currently a little (a lot) bland.  It's all builder's basic with no upgrading in sight.  Here is a 'Before' to update your memories.


And here is a mock-up of the floorplan with my best estimation of scale without actually measuring.


Finding inspiration on other blogs and on pinterest, we have a lot of great ideas!


We would love to add a wooden frame to the existing mirror!


Wouldn't this color look amazing on our white laminate cabinets?  So rich, yet chic.  I'm loving that hardware too!  Craig is partial to the polished nickle, and I'm all about the bling-ing chrome.


This is such a cute idea to really add some personality to the space.


And HERE is what we've come up with for our inspiration, some minky washed out chocolate on the walls, a deep grey-bordering-on-bluey for the cabinets and a bright white molding around the mirror.

Here is our tentative checkilist:
  • paint the walls (maybe minky chocolate?)
  • paint the laminate cabinets (dark! grey)
  • frame out the mirror in molding
  • find a light fixture (*sigh...)
  • DIY a window covering
  • plan the coordinating closet revamp
  • plan a coordinating fun extra for the 'loo' room

What do you think?  Too much?  Not enough?  How hard are those cabinets going to be to paint?  What about art?  What's in your bathroom?

Of course, since our closet is attached.  We couldn't leave it un-spiffified could we?  more to come! (Including maybe a stencil)

July 10, 2011

Laundry Room: Inching Along

Still hmming and hahing on whether cabinets are the best option in the laundry room, however we have decided upon a light.

We'd seen a lot of posts lately around the blog-o-sphere taughting the virtues of outdoor lights indoors.  And since the light was such a challenge (ongoing epic battle between budget and aesthetics) we decided to take a gander at our options.

Our verdict: Damn. 
a) a lot of choice
b) excellent budget friendly options
c) quite a lot of variety, especially in ceiling or flush mount options (and not a boob lamp in sight)

We were originally considering an Ikea pendant, but upon seeing our options in person, it just wasn't quite right.

After reviewing our online options , we had 2 final front runners:


We weren't able to find the lantern pendant (boo) so we went with the ceiling mount seeded glass fixture.  And I gotta tell you the display photo on HD.com does not do it justice.  And $30.  Wow.

The Install:

Here is the sad fixture we started with.  Poor laundry room was neglected.


Craig staring it down, tempting it to be contrary (which it was, maybe a little).


Once the old light was down, it was time to read through the installation instructions and figure out our game plan.  It was pretty simple, even from my 'assisting' vantage point.  (I operated the lamp once the power was out and held the fixture up to the ceiling while wires were being attached).  The wire shelf still taunts me.


And fixture done!  It makes that popcorn ceiling look good!  Well, as good as a popcorn ceiling can look anyway.  And a close-up of the seeded glass.


All told this part of the revamp cost us $30 and 20 minutes of work.  WOO!

5 Minute Fix: Vent Cover

We are of the opinion that projects around your home don't have to be expensive or time consuming to be valuable.  You can do something as simple as changing out a light fixture, a electrical outlet cover or a vent cover and make an impact!

We have a lot of dingy white metal vent covers around our place and wanted to start bringing some bling to our travertine. 

Here's what we started with:

Builder's grade and kinda dusty (oops).


And another angle.


We had a few vents we could have started with, but figured the foyer would be best, after all it's the first thing you see.  We invested in one vent cover to see if the metal color would work with the flooring.  This one is Decor Plates Oil Rubbed Bronze from Home Depot.

Here's Craig doing the install.  Eww, what do we have living down there?


Instructions for installation: Pop Off, Pop on.  Seriously it's exceedingly simple.

And here is the finished product:

So easy.


What's your favorite 5 minute fix?